
fbpx

Barlinek flooring in your interior   

See visualization

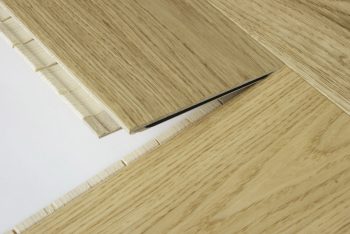
Modern Classic Herringbone Joint

CLASSIC HERRINGBONE FLOATING INSTALLATION

The New Optilock™ joint enables installation without the need for RIGHT AND LEFT-HAND BOARDS.*This is Barlinek’s new glueless front joint to make installation of Classic Herringbone boards CLEAN, QUICK AND EASY.

*See the installation instructions and warranty card for detailed information on the installation and use of the Classic Herringbone boards.


OPTILOCK ENSURES: :
  • Compared to the instalation of a classic herringbone with right and left-handed boards, there is half of the material waste
  • Twice as fast installation
  • Saves time during purchase
  • No need to calculate right and left-hand boards
  • You can do it yourself which means simple, inexpensive and fast installation.
  • Can be laid on old floorboards and non-renovated floors.
  • The floor is ready for use immediately after installation.
  • Damaged boards can be easily replaced.
  • Can be laid on underfloor heating
  • Our joint can withstand the pressure of a 65 mm roller with a force of 6,000 N, which is a load of over 600 kg

INSTALLATION VIDEO

Floating installation

Glue down installation

INSTALLATION INSTRUCTIONS

If you want to install a parquet by glueing it down to the floor, you should engage a professional parquet-laying company. If you try to perform the installation works yourself, you might damage the parquet, soil it with the adhesive and make installation errors.

1. Start the installation by assessing the subfloor. The maximum irregularities should not exceed 3 mm/2 m. Even out the subfloor mechanically by grinding or milling or using smoothing or levelling compounds.

Alternative methods to even out the subfloor include using OSBs, plywood or cement fibre boards.

2. Cracked, non-bearing or dusting subfloors are not suitable for the installation of wooden floors. They should be accordingly prepared and reinforced. Screeds with joint faulting should be cut, stitched and poured over with resins available on the market. The subfloor must meet the following strength requirements – values:
– at least C12, F4 – floating floor;
– at least C20, F5 – glued floor.

3. Before applying the adhesive, the strength of the subfloor should be tested with an “RI-RI” surface hardness tester by making a grid of scratches. Pull the spring to the medium setting, corresponding to a pressure of 18 MPa. Layered floors can be glued only onto subfloors assessed as hard and medium hard after the measurement – figure 1.

Subfloors of inadequate strength (figure 2) can be reinforced with polyurethane, epoxy or silicate primers.

1

2

4. Before installation, check the moisture content of the subfloor. The recommended values must not exceed:
– 2% CM (75% rh) for cement screeds and 0.5% CM (50% rh) for anhydrite screeds;
– for heated subfloors – 1.8% CM (65% rh) for cement screeds and 0.3% CM (40%) for anhydrite screeds;
– for subfloors made of boards or wood-based panels – 11%.
In addition to the CM measurement method, it is also permitted to perform the measurement using electronic meters or measure the relative humidity in a hole.
If the moisture content is higher than recommended, the screed should be seasoned or vapour barrier primers should be used according to the product data sheets – NOTE! Do not use vapour barrier primers for heated screeds and anhydrite screeds.
If underfloor heating systems are used, perform the heating procedure according to the Barlinek Underlayment Heating Protocol – completing the heating process does not release the contractor from the obligation to measure the moisture content.

5. Before glueing the floor down, carefully grind the subfloor with a single-disc machine, using suitable milling heads or meshes. This is done to remove weaker, superficial layers of screed – this is particularly vital for anhydrite screed.

6. Prime the subfloor with a commercially available primer – for glued floors (if required). For floating floors, priming is regarded as a good installation practice, particularly with a dusting subfloor. In such cases, use popular dispersion primers for the construction industry that bind dust.

7. Two different solutions can be used if you install the classic herringbone pattern on underfloor heating systems:
1. Glueing the floor down to the subfloor.
Do not use solvent-based and dispersion adhesives. It is recommended to use one-component adhesives of the following types: PU (polyurethane), MS (silane) and MSP (MS polymer), intended for multi-layer engineered flooring.
Glueing the whole floor down also enables the installation of the entire flooring in apartments and storeys of homes without making intermediate expansion joints and filling expansion gaps with cork/elastomer at joints with, for instance, tiles or stone.

2. Glueing butt joints of boards with wood adhesives with the D3 moisture resistance class. Apply the adhesive to the short side of the board in such a way that it flows out when the joint is closed – remove excess adhesive with a wet cloth.

8. Where underfloor heating systems are used, the maximum temperature on the surface of the floor cannot exceed 29°C.
In addition to submerged heating systems, the floor can also be installed on heating film – in such cases, use solution No. 2 – glueing the joints.
The classic Barlinek herringbone pattern can also be installed on the underfloor cooling system by glueing. The section below contains the key parameters and guidelines concerning the use of underfloor cooling systems.

9. The floating floor cannot be in any way obstructed by parts of the structure or heavy, permanent fixtures. A 10-mm expansion gap should be left along the walls. Do not install the boards under kitchen cabinetry and islands – finish the floor line under the baseboards or cut out places for the feet in the floor – NOTE – This does not apply to glued installation.

10. The subfloor for the classic floating herringbone must meet suitable parameters:
– compressive strength CS ≥ 220 kPa;
– static compressive strength CC (kPa) at least ≥ 40 kPa;
– resistance to dynamic loads DL (cycles) at least ≥ 100 000 cycles;
– vapour resistance SD > 75.

11. Before installation, season the boards in the recommended microclimate conditions. This stage is particularly important during seasons with differences between outdoor and indoor temperatures (autumn/winter).
The same microclimate conditions must be observed during the service life of the floor.
NOTE! If you cannot fulfil the above-mentioned recommendations – temporarily heated homes, no humidifiers, installation in places with high temperature and humidity variations during the year, installation in areas temporarily out of use (e.g., development projects) – the floor with the classic herringbone pattern should be glued to the subfloor.

12. The classic herringbone floor in the floating version can be installed on a surface of up to 15×15 m without intermediate expansion joints – in a single room without any partitions. Always make expansion joints at door openings.
NOTE! For glued installation, there is no need to make intermediate expansion joints.

The starting point for the installation should depend on arrangements with the client. If you decide to install the floor symmetrically relative to the room, you can start by marking the centre of the room – dashed line. Then, mark another line that will be passed by the corners of the boards during the installation. Keep moving this line to the right (if you begin with a board on the right), by the following dimension:
– for a board with a width of 110mm-40mm;
– for a board with a width of 130mm-45mm;
– for a board with a width of 180mm-65mm.
The minimum board length is, respectively:
660 mm – 659.3 mm
725 mm – 724.3 mm

The classic herringbone pattern can also be installed in more complex layouts – depending on the length and width of the boards.
NOTE! To install a pattern different from a single herringbone, you need to glue the boards to the subfloor.